- Created by Mariann Hawken, last modified on Jul 25, 2022
-
Request approval
You are viewing an old version of this page. View the current version.
Compare with Current View Page History
« Previous Version 19 Next »
Show Me
The following video was hosted by VoiceThread for UMBC instructors (UMBC login required to access). The video provides an overview of VoiceThread Assignment features.
VoiceThread Assignments Webinar Recording
Tell Me
STEP 1: Add a VoiceThread link to your Blackboard course.
- Log into Blackboard and access your Blackboard course. Select the instructions below for adding a VoiceThread link in a Blackboard original or a Blackboard Ultra course.
For Blackboard Original:
- Select a content area from your course menu.
- Click on Build Content from the menu.
- Select VoiceThread from the menu.

- The VoiceThread Setup window will launch.
For Blackboard Ultra:
- Select a place where you want the VoiceThread link to appear on your Course Content page.
- Click the purple (+) to add content anywhere on the page where you want to place the VoiceThread. This includes inside folders or Learning Modules.

- Choose Content Market.

- Scroll down the list of available tools to the end where VoiceThread is located.
- Select VoiceThread.

- The VoiceThread Setup window will launch.
STEP 2: Configure Your Activity
You will see the VoiceThread set up page. To create a graded assignment, click on the Assignment Builder button.

There are three types of assignment you can create:

Select an assignment type below for details specific to that assignment.
Require students to create a VoiceThread. They will upload the slides and record comments, then submit that to you for a grade. You can even allow students to see their classmates’ submissions later so they can engage in peer review and conversation. This is a great option for:
- Student presentations
- Demonstration of a skill
- Submitting a paper, website, etc. to receive feedback
Step 1: Choose Activity
Click on the Create button, then click “Continue” at the bottom of the screen.

Step 2: Choose options
Select the playback settings you want each student’s VoiceThread to have. Students will not be able to override these settings.

- Number of comments required: Students will be required to post comments on the VoiceThread they create. You can require a minimum number or an exact number. They will not be permitted to submit until this requirement is met.
Important: This is the number of comments students record on their own VoiceThread, not on a classmate’s submission. - Number of slides required: Students will be required to add this number of slides to their VoiceThread. Minimum number of slides required is always 1 by default, but you can require more if desired.
- Commenting types: Select which types of comments you want to allow students to post.
- Allow students to add slides to any VoiceThreads for this assignment: Allow students to add slides to any VoiceThreads submitted by their classmates to this assignment.
- Enable threaded commenting: Turns on the ability for your participants to start threaded conversations.
- Enable comment moderation: Allows you and the student to preview all comments on this VoiceThread before revealing them to others. You can also choose never to reveal them. Learn more about Comment Moderation.
- Don’t allow commenters to delete their own comments: Anyone who records a comment on a VoiceThread will be unable to delete it once it is saved. This is a powerful tool for assessment because your commenters will not be able to “retry” after they’ve recorded.
- Limit length of each comment: By default, all audio and video comments recorded in VoiceThread can be 60 minutes long. If you’d like to set shorter time limits for your commenters, enter your desired maximum comment length here.
- When recording, automatically advance to the next slide after: Set slides to advance automatically at pre-set intervals as users are recording. In addition, you can check the box for Pecha Kucha or Ignite beneath this option to automatically set the correct restrictions for those presentation types. Learn more about timed presentations here.
- Start playing when opened: The comments on your VoiceThread will begin playing automatically when people first open it.
- When final comment on a slide has played, automatically advance to the next slide after __ seconds: When the VoiceThread is in play mode, it will play through all of the comments on a slide and then move to the next slide automatically. The number of seconds is the “pause” time before the slide advances.
- Allow download: Allow students to download the central media from the VoiceThreads their classmates create.
- Allow export: Allow students to export one another’s VoiceThreads.
- Allow students to make a copy: Allow students to make a copy of one another’s VoiceThreads.
- Student Gallery: If you want students to view one another’s VoiceThreads after they are submitted, check this box. This will give them a “Student Gallery” button in their interface to see the VoiceThreads their classmates have submitted for this assignment.

Click “Continue” at the bottom of the screen when you’re done.
Step 3: Finalize
Set the final details for your assignment.
- Assignment name: This will appear at the top of the assignment in the student’s view.
- Assignment instructions: These instructions will appear on the right-hand side of the student’s view. Tell them more about what you expect from them here.
- Example URL: If you have created an example you want students to follow or more information about the assignment, enter the link to that page here. It will appear on the right side of the student’s view.
- Message shown to student after they submit: Customize the message students see after they’ve submitted their VoiceThread. A little personalization goes a long way!
- Start date: Students will not be able to view the assignment until the start date/time. If you want it to be open immediately, leave this blank.
- Due date: This is the date the assignment is due. Students can still submit after the due date, but they will be marked late.
- Close date: Students will not be able to access the assignment at all after this date. If you want the assignment to be open indefinitely, leave this blank.
- Allow students to resubmit assignment: Give students the opportunity to try again if they submit the wrong thing or need to make corrections after you give them feedback.
- Allow students to view assignment after submitting: If you don’t want students to be able to see the work they’ve submitted, un-check this box. If you want them to see their work so you can record feedback on it, leave it checked. They will not be able to make any changes to their work even if they can see it.
- Assessment: Choose how you would like to grade this assignment.

Click “Publish” at the bottom of the screen when you’re done.
Require students to post comments on a VoiceThread that you have created. You can decide whether or not students can see one another’s comments. This is a great for:
- Graded discussions
- Quizzes
- Speaking practice (public speaking, language practice, reciting poetry)
Step 1: Choose Activity
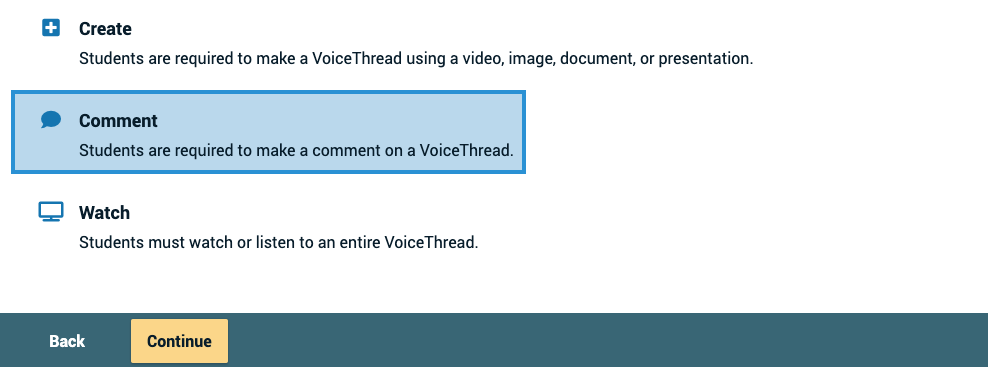
Click on the Comment button, then click “Continue” at the bottom of the screen.
Step 2: Choose content
Select which VoiceThread you want to use for this assignment. Students will be recording their comments here. To use an existing VoiceThread, select from any of the ones you have created or that you can edit, and then click “Continue” at the bottom of the screen. This will take you to the page where you can make any edits necessary. Once you choose the VoiceThread you want to use, a copy of that VoiceThread will be made to use in this assignment. You will continue to own the clean original.
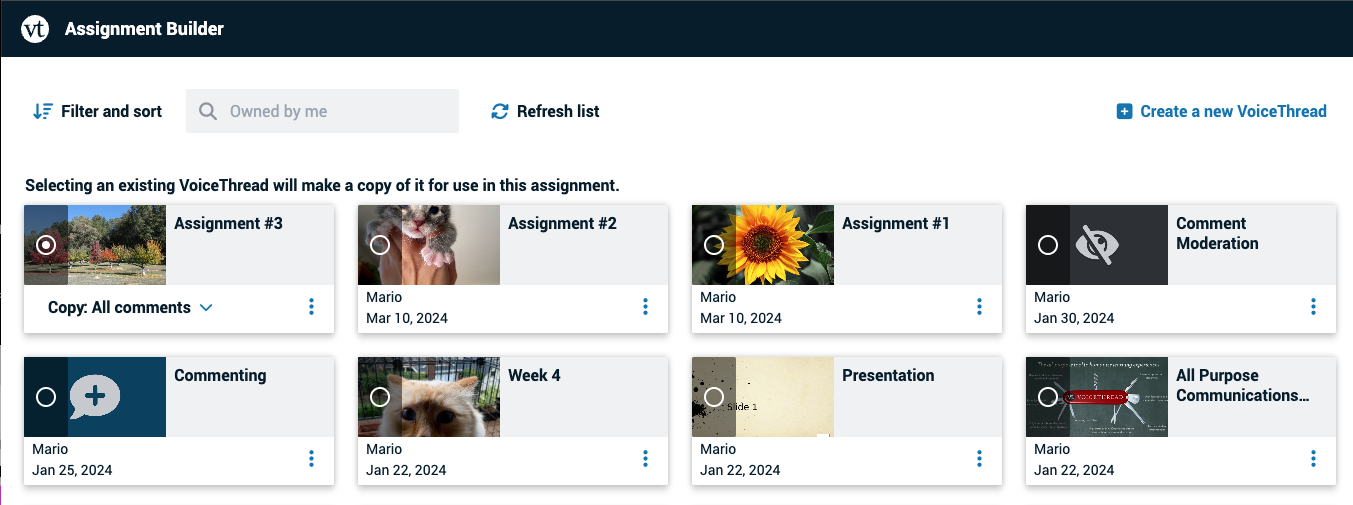
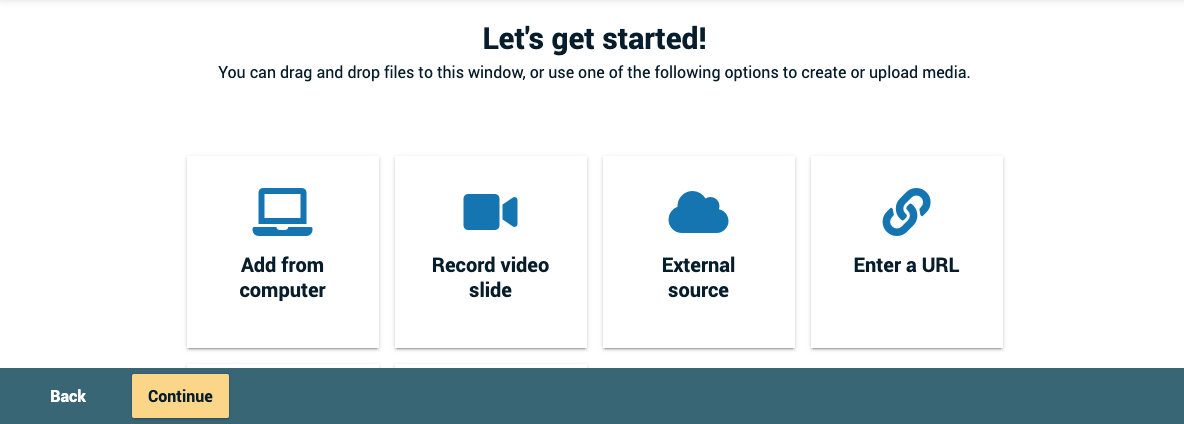
If you haven’t created the VoiceThread you want to use yet, click on “Create a new VoiceThread” in the top-right corner. This will take you to the create page, where you can upload new slides and click “Continue” at the bottom of the page to open the VoiceThread and record comments.
Step 3: Choose options
Select the playback settings you want your VoiceThread to have.
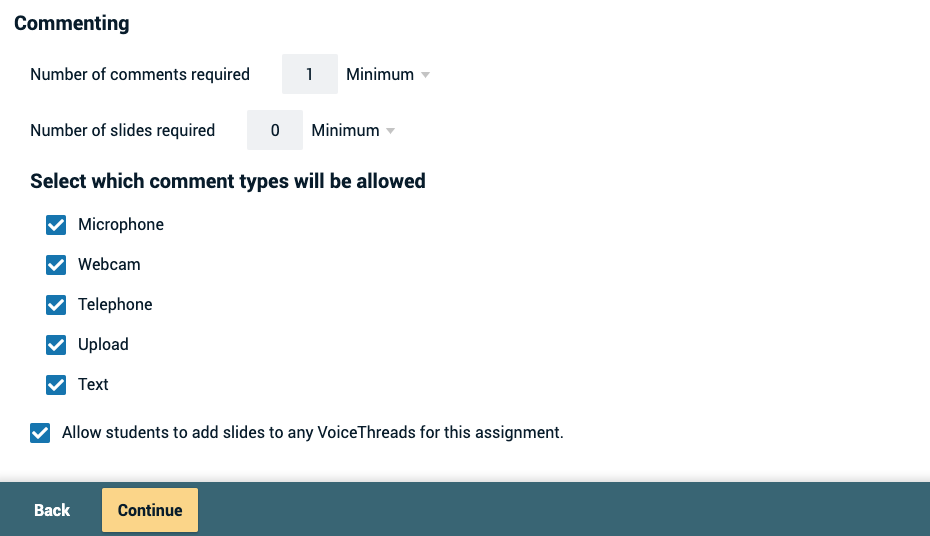
- Number of comments required: Students will be required to post comments on your VoiceThread. You can require a minimum number or an exact number. They will not be permitted to submit until this requirement is met.
- Commenting types: Select which types of comments you want to allow students to post.
- Enable threaded commenting: Turns on the ability for your participants to start threaded conversations.
- Enable comment moderation: Allows you to preview all comments on this VoiceThread before revealing them to your students. You can also choose never to reveal them. Learn more about Comment Moderation.
- Don’t allow commenters to delete their own comments: Anyone who records a comment on this VoiceThread will be unable to delete it once it is saved. This is a powerful tool for assessment because your commenters will not be able to “retry” after they’ve recorded.
- Limit length of each comment: By default, all audio and video comments recorded in VoiceThread can be 60 minutes long. If you’d like to set shorter time limits for your commenters, enter your desired maximum comment length here.
- When recording, automatically advance to the next slide after: Set slides to advance automatically at pre-set intervals as users are recording. In addition, you can check the box for Pecha Kucha or Ignite beneath this option to automatically set the correct restrictions for those presentation types. Learn more about timed presentations here.
- Start playing when opened: The comments on your VoiceThread will begin playing automatically when people first open it.
- When final comment on a slide has played, automatically advance to the next slide after __ seconds: When the VoiceThread is in play mode, it will play through all of the comments on a slide and then move to the next slide automatically. The number of seconds is the “pause” time before the slide advances.
- Allow download: Allow students to download the central media from your VoiceThread.
- Allow export: Allow students to export Your VoiceThread.
- Allow students to make a copy: Allow students to make a copy of your VoiceThread.
Click “Continue” at the bottom of the screen when you’re done.
Step 4: Finalize
Set the final details for your assignment.
- Assignment name: This will appear at the top of the assignment in the student’s view.
- Assignment instructions: These instructions will appear on the right-hand side of the student’s view. Tell them more about what you expect from them here.
- Example URL: If you have created an example you want students to follow or more information about the assignment, enter the link to that page here. It will appear on the right side of the student’s view.
- Message shown to student after they submit: Customize the message students see after they’ve submitted their VoiceThread. A little personalization goes a long way!
- Start date: Students will not be able to view the assignment until the start date/time. If you want it to be open immediately, leave this blank.
- Due date: Students will not be able to submit after this date. If you want the assignment to be open indefinitely, leave this blank.
- Allow students to resubmit assignment: Give students the opportunity to try again if they submit the wrong thing or need to make corrections after you give them feedback.
- Allow students to view assignment after submitting: If you don’t want students to be able to see the work they’ve submitted, un-check this box. If you want them to see their work so you can record feedback on it, leave it checked. They will not be able to make any changes to their work even if they can see it.
- Assessment: Choose how you would like to grade this assignment.
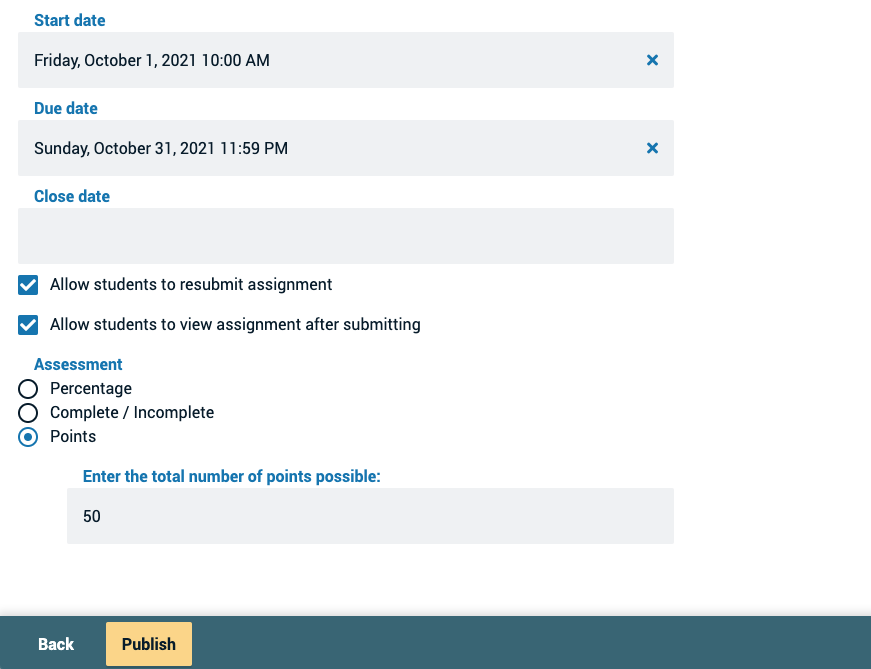
Click “Publish” at the bottom of the screen when you’re done.
Require students to watch a VoiceThread in full. This is a great for:
- Non-interactive lecture delivery
- Compliance and training
Step 1: Choose Activity
Click on the Watch button, then click “Continue” at the bottom of the screen.
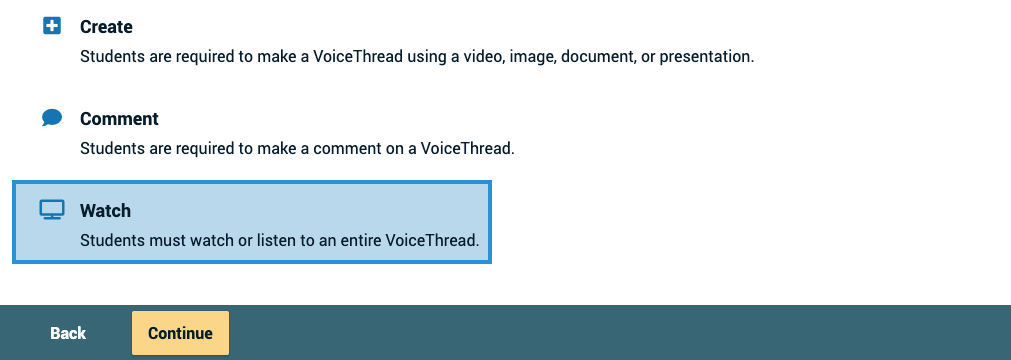
Step 2: Choose content
Select which VoiceThread you want to use for this assignment. Students will be required to watch 100% of all slides and comments. To use an existing VoiceThread, select from any of the ones you have created or that you can edit, and then click “Continue” at the bottom of the screen. This will take you to the page where you can make any edits necessary. Once you choose the VoiceThread you want to use, a copy of that VoiceThread will be made to use in this assignment. You will continue to own the clean original.

If you haven’t created the VoiceThread you want to use yet, click on “Create a new VoiceThread” in the top-right corner. This will take you to the create page, where you can upload new slides and click “Continue” at the bottom of the page to open the VoiceThread and record comments.

Step 3: Choose options
Select the playback settings you want your VoiceThread to have.
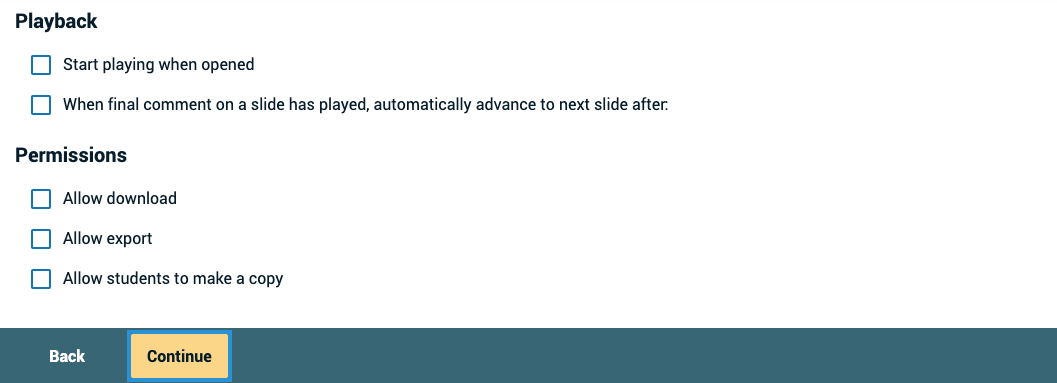
- Start playing when opened: The comments on your VoiceThread will begin playing automatically when people first open it.
- When final comment on a slide has played, automatically advance to the next slide after __ seconds: When the VoiceThread is in play mode, it will play through all of the comments on a slide and then move to the next slide automatically. The number of seconds is the “pause” time before the slide advances.
- Allow download: Allow students to download the central media from your VoiceThread.
- Allow export: Allow students to export Your VoiceThread.
- Allow students to make a copy: Allow students to make a copy of your VoiceThread.
Click “Continue” at the bottom of the screen when you’re done.
Step 4: Finalize
Set the final details for your assignment.
- Assignment name: This will appear at the top of the assignment in the student’s view.
- Assignment instructions: These instructions will appear on the right-hand side of the student’s view. Tell them more about what you expect from them here.
- Example URL: If you have created an example you want students to follow or more information about the assignment, enter the link to that page here. It will appear on the right side of the student’s view.
- Message shown to student after they submit: Customize the message students see after they’ve submitted their VoiceThread. A little personalization goes a long way!
- Start date: Students will not be able to view the assignment until the start date/time. If you want it to be open immediately, leave this blank.
- Due date: Students will not be able to submit after this date. If you want the assignment to be open indefinitely, leave this blank.
- Allow students to resubmit assignment: Give students the opportunity to try again if they submit the wrong thing or need to make corrections after you give them feedback.
- Allow students to view assignment after submitting: If you don’t want students to be able to see the work they’ve submitted, un-check this box. If you want them to see their work so you can record feedback on it, leave it checked. They will not be able to make any changes to their work even if they can see it.
- Assessment: Choose how you would like to grade this assignment.
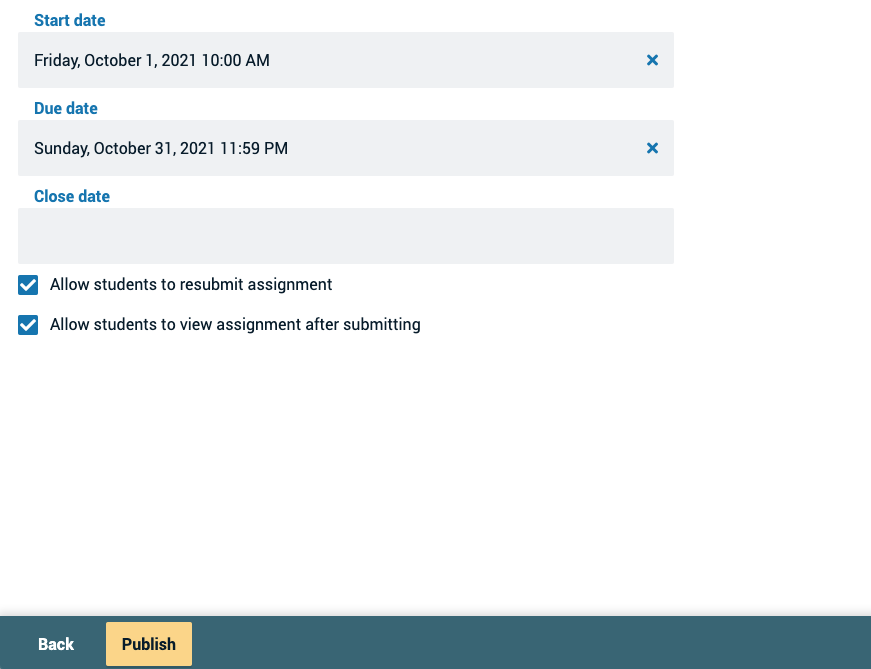
Click “Publish” at the bottom of the screen when you’re done.
STEP 3: Refresh Blackboard and Edit Your Link
- Once you have finished setting up VoiceThread, refresh Blackboard to see the new VoiceThread link appear in your course. Click on the overflow menu (...) on the far right of that VoiceThread link.
- Click EDIT to modify the VoiceThread settings in the Ultra course, including the link name and grade book settings.

STEP 4: Wait for Students to Submit
When students go to your assignment, they will see the interface to complete the required work and submit. For details, visit the assignment guide for students.
STEP 5: Grade Student Submissions
To grade your students’ submissions, just return to the assignment you have set up. You will see the grading interface automatically.
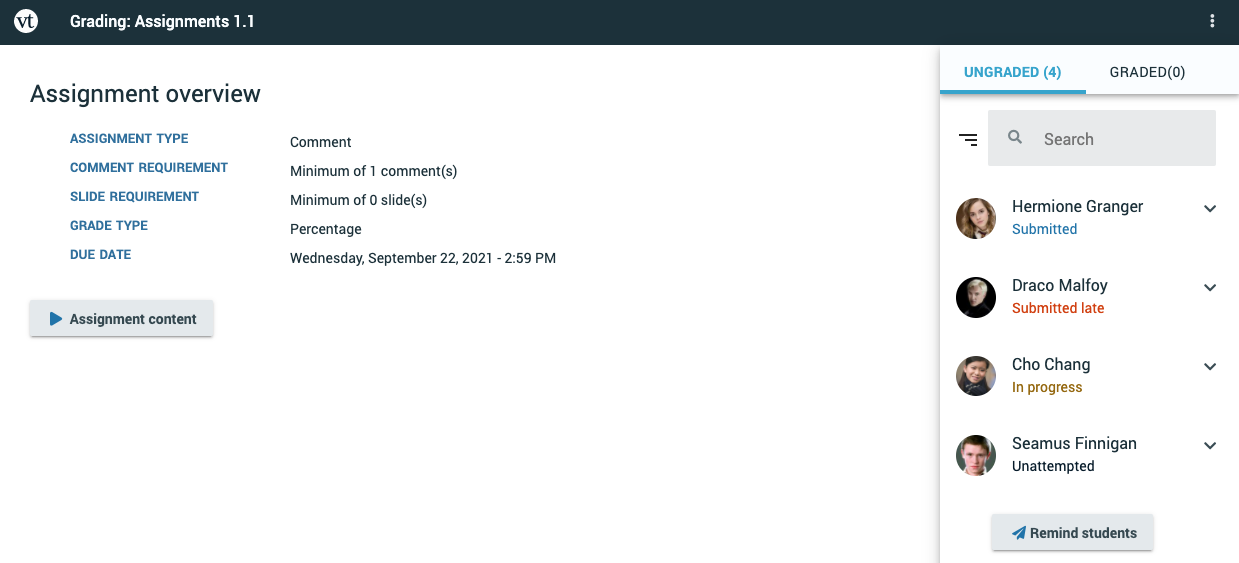
On the right side of the page, you will see your course roster. If a student is missing from the roster, it means that student has not clicked into your assignment at all yet, but they will appear as soon as they do. Students can fall into three categories:
- Submitted: Students who have submitted their final assignment
- In progress: Students who have started working on the assignment but have not yet submitted
- Unattempted: Students who have not yet begun working on the assignment at all
You can enter grades for students who are listed as “Submitted” or “In progress.” Click on a student’s name to see their submission, then enter the grade into the text box or pass/fail selector on the right and press Enter on your keyboard.
Additional features:
- Reminders: To remind a student to submit, click on the student’s name, and then click on the “Remind” button. You can also click “Remind Students” at the bottom of the list to remind all students who have not yet submitted.
- Un-submitting: If a student has submitted an assignment but needs to try again, click on the student’s name, click on “Additional options” beneath the grading area, then click “Unsubmit.”
- Changing grades: To see students who have already been graded, click on the “Graded” tab in the top-right corner, and then click on any student in that list to enter a new grade for them.
- Student gallery: If you have created a “Create a VoiceThread” assignment and enabled the student gallery, you will see the student gallery button on the main landing page (Assignment Details area).
- Edit the assignment: If you need to make changes to how this assignment is configured, click on the menu icon top-right and select “Edit assignment”.
IMPORTANT: Editing an assignment that is in progress may make existing student work inaccessible. It is best not to edit an assignment that is already being used, but if you must, keep in mind that selecting a different VoiceThread or even re-selecting the same one can cause student work not to be counted.

- No labels