Overview
Blackboard Groups allow you to implement team-based learning in your courses. Users within the same group have their own group workspace within Blackboard to submit assignments and access group-specific tools. Students can be added to groups manually, enroll themselves, or be randomly assigned to groups.
Batch importing students to groups requires two key steps: Preparing the CSV file and uploading the CSV file to the Blackboard course.
After groups are created, you can add the students to the groups. See → How do I batch import students into groups?
Tell Me
- Go to Control Panel → Users and Groups → Groups.
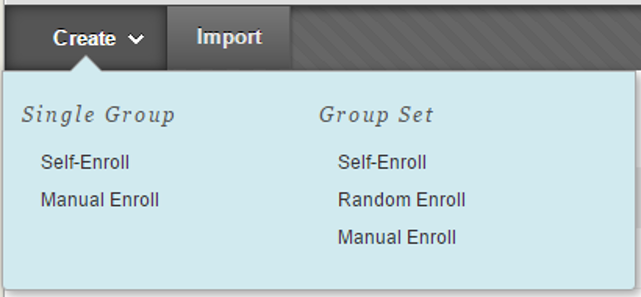
- To create groups, mouse over Create:
OPTION 1: Create a single group - choose an option from the Single Group section.
OPTION 2: Create multiple groups at once - choose an option from the Groups Sets section. Select the enrollment option for your group(s):
Manual enrollment involves the Instructor selecting each member one at a time from a list of all the students in the Course.
Random Enrollment is best suited for multiple groups, where the Instructor allows the system to divide up all the members of the Course among all the groups based on criteria chosen by the Instructor.
Self Enrollment allows the students themselves to become members of groups by using Sign-Up Sheets that Instructors create for each Course Group.
Type a Name and optional Description on the Create Group page.
Select Yes to make the Group Available or select Sign-up Sheet Only.
Select the Tools available to the Group by selecting the appropriate check boxes.
Select the Grade option and type Points possible for Blogs, Journals, and Wikis, if student submissions will be graded.
Select the checkbox for Allow Personalization to allow individual Group members to add Personal Modules to their Group Homepage.
Depending upon enrollment type:
For Self-Enrollment, select the Sign-Up Options, including titling the Sign-up Sheet.
For Random Enrollment, add values for:
Determine Number of Groups by number of students or number of groups
Determine How to Enroll any Remaining MembersFor Manual Enrollment, in the Membership section, select the students from the Items to Select box and click the right-pointing arrow to add the selected names to the Selected Items box.
Select the Maximum Number of Members.
- Click SUBMIT.
- Go to the Ultra course and navigate to Books & Tools on the left menu.
- Open the Books & Tools peek panel.
- Scroll down and click on UWM Groups Tool.

A peek panel will open from the right. The overview will show history of previous runs of the Groups & Group Enrollments for the given course. You can use the Refresh button to check for updated processing of uploads currently in progress. Click on Upload Groups.

- A peek panel opens where you can upload your CSV for Groups.
- Upload your CSV file.

- Click on SUBMIT.
- The file is processed in the background and added to the overview page.
You should receive an email when your groups list has been processed.
Notes:
Although User Workflow Manager (UWM) tool for groups is available primarily for Ultra courses, it can be used with groups in Original courses. Access it via Control Panel → Course Tools → UWM Groups Tool.
The User Workflow Manager (UWM) tool for groups can be performed by any Instructor, Course Builder, or Teaching Assistant enrolled in the course.