Over time, PowerPoint files can easily grow in size as more images and audio/video are embedded. There are two key techniques you can use to optimize your PDFs PPTs before uploading them to Blackboard.
FIRST: Compress Embedded Images
PowerPoint for Windows or Mac- Select image on slide.
- Click tool ribbon and select Picture Tools -> Format tab.
- Select Compress Pictures.
- Chose 96 PPI (e.g., email) to compress the images to the smallest size possible.
- If you've cropped the images in the slide, be sure to check Delete cropped areas of pictures so you don't have to redo your work.
- Save or export your file to PDF using one of the methods below.
- If you want to apply this to all images,
- Windows users: uncheck the box for Apply only to this picture.
- Mac users: Select the radio button for All pictures in this file.
- If you want to apply this to all images,
NEXT: Save a Smaller Copy
PowerPoint for Windows:
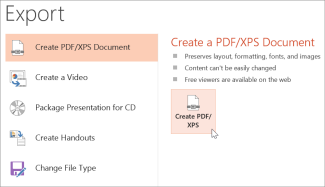
Select File > Export.
Click Create PDF/XPS Document, then click Create PDF/XPS.
In the Publish as PDF or XPS dialog box, choose a location to save the file to. If you want it to have a different name, enter it in the File name box.
At Optimize for, select Minimum size to make the file smaller.
Click Publish.
PowerPoint for Mac:
Click the PowerPoint menu > Preferences.
In the PowerPoint Preferences dialog box, click General.
Under Print Quality (Paper/PDF), set the Desired Quality to an option of your choice.
Set the print quality of the PDF to Medium or Low.
Then generate your PDF using one of these ways:
Save your presentation as a PDF in File > Save As.
Export your presentation as a PDF file by going to File > Export.
Both methods do the same thing, so you can choose whichever you're more familiar with when you want to create a PDF version of your presentation.
NOTE: If you are using Mac OS Preview to generate a PDF:
Open the PDF, then choose File > Export.
Click the Quartz Filter pop-up menu, then choose Reduce File Size.


