Groups can be used for assignments or tests. At this time you cannot use groups to filter the grade book or set up conditional availability.
Tell Me
You start the course groups creation process on the Course Content page. In the Details & Actions section under Course Groups, select Create and manage groups.

All groups you've created appear on the Course Groups page. Group sets with no members also appear. At the top of the page, the numbers of groups sets and individual groups are listed.
You can also create a new group set.
- Select a heading to sort your groups or the number of members in ascending or descending order.
- Show or hide the groups in a group set.
- Open a group set's menu to edit or delete the group.
- View the number of members in each group out of the total number of students in the course.
If you've already set up course groups, select View sets & groups link. If you already have course groups, select New Group Set on the Course Groups page.

You can create as many course groups as you want, with any number of students in each group. You can also create new course groups or remove course groups.
Types of Groups in Ultra Courses
From the Group students menu, you can divide your students among groups in these ways:
- Custom
- Randomly assign
- Self-enrollment
- Reuse groups
You can also select the plus sign below the graphic to create as many groups as you need and add students.
| Info |
|---|
| NOTE: You can reuse an existing course group or group set. However, if you make changes to a group set you've reused, those changes affect any group assignments and discussions based on that group set. |
Creating Groups
With a group set, you can create multiple groups around a theme, such as a lesson, brainstorming, studying, or volunteering. With group sets, you can pair students based on certain attributes, situations, or tasks. You can create up to 99 groups in a group set.
When you create course groups for the first time or want to add a new group set, a partial list of your students appears on the New Group Set page in the Unassigned Students section. Select Show All to view the entire list.

Create Custom Groups
You can create a single, custom group or as many groups as you want, with any number of students in each group.
You can also select the purple plus (+) below the student list to create a custom group and add students. If you already have course groups, select New Group Set on the Course Groups page.

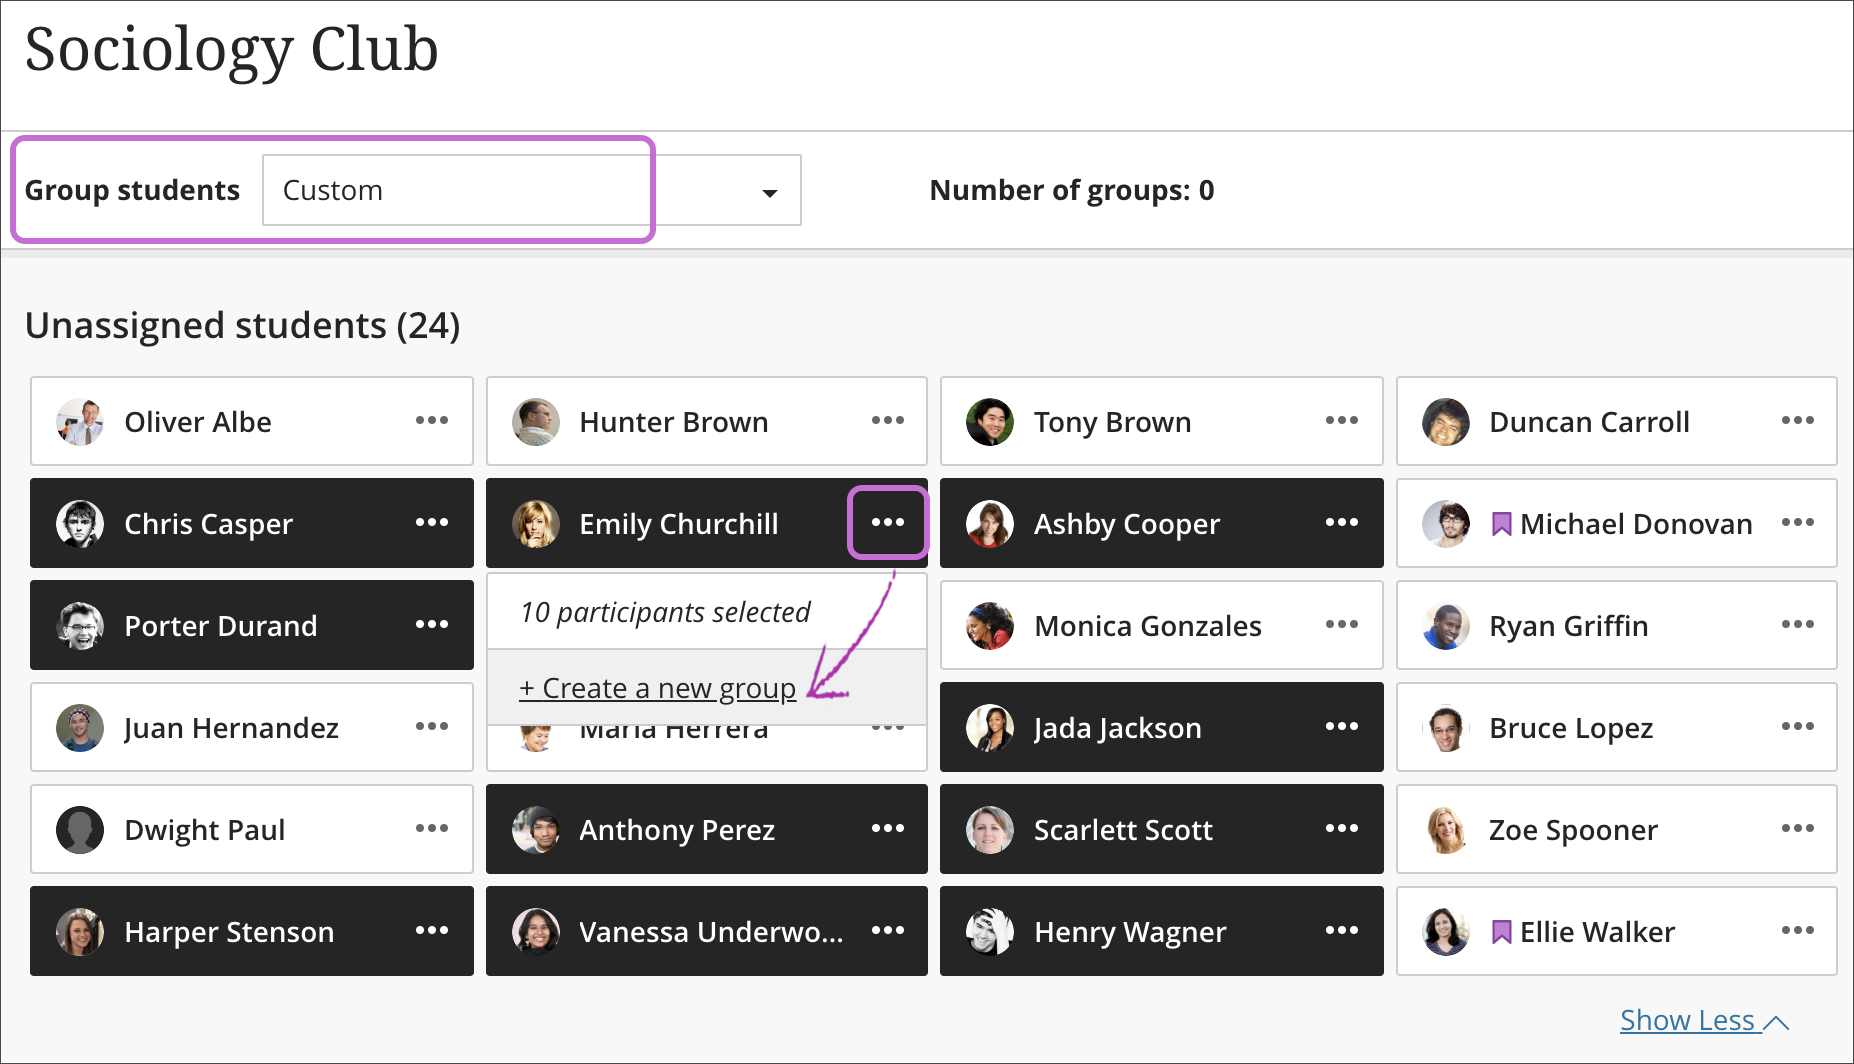
- In the Group students menu, select Custom and provide a name at the top of the page.
- Select each student's name one after the other to select them as a group. Select a student's name again to remove the selection.
- After you select the students, open the menu next to one of their names and select Create a new group. You can also move multiple students to a group listed in the menu.
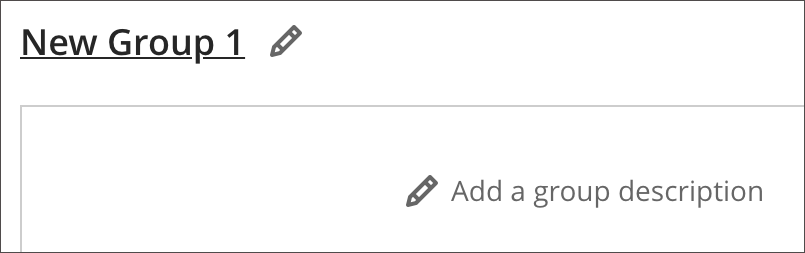
- Edit the group name if you want to change the default naming.
- Optionally, provide a group description that also appears to members of that group. You have no limit on the number of characters.
Select the plus sign wherever you want to add another group. You can also repeat steps 2-5.
Info NOTE: At this time, if you save a Custom group set, return to the group set, and select Custom again, your groups are deleted.
Create Random Groups
Random assignment may work best if you teach courses that contain many students without the opportunity to know them individually. You can assign students to groups quickly and without preparation. Students are randomly assigned to the number of groups you choose. NOTE: You need at least four students so the system can randomly assign students to at least two groups.

- In the Group students menu, select Randomly assign and provide a name at the top of the page.
- In the Number of groups menu, select how many groups to create. You need to create at least two. Students are equally assigned to the number of groups you choose.
To remove all students from the current group set, select Unassign All at the top of the page. The menu option changes to Custom if you move students to different groups after they're grouped and before you save.
- Edit each group name if you want to change the default naming.
- Optionally, provide group descriptions that are shown to group members. You have no limit on the number of characters.
Select the plus sign wherever you want to create a group in addition to the groups the system created. When you add or delete groups, the menu option changes to Custom and any affected students aren't redistributed
.Create self-enrollment groups
You can ask students to self-enroll in course groups. Only students may join. Students receive a course announcement and an activity stream notification about groups they need to join.
Students see Join a group and New in the Details & Actions panel on the Course Content page. You can also add an enrollment period. Students are notified when the enrollment deadline approaches. When the enrollment period ends, students can no longer join groups, and they’re enrolled automatically.

.
Select the arrow next to Advanced options to collapse the enrollment section.Pay attention to the maximum members per group and the number of groups. For example, if you lower the maximum number, some students won’t be allowed to enroll in a group at the end of the enrollment period. You’ll need to create new groups and enroll the students.
To allow unlimited members per group, leave blank. Students see the maximum number allowed when they make their group selections. If you allow an unlimited number per group, students see the total number of students in their class.
You can override the maximum membership for a group. For example, you can add a newly enrolled student to a group.
| Info |
|---|
| If you added a preview user, that user is also enrolled automatically in a group. You can remove the preview user before or after you create self-enrollment groups. |
Manage individual groups
After you create a group or a group set, you can add or delete individual groups and manage student membership. You can also edit group names and send messages to your groups to kick off collaboration! Reminder: At this time, if you save a Custom group set, return to the group set, and select Custom again, your groups are deleted.

Add and delete groups
Select the plus sign wherever you want to add a group.
If you no longer need a group, open the group's menu and select Delete group. The students in that group are unassigned automatically and appear at the top of the page. You can manually assign these students to new groups. Or, you can randomly assign all students—not only the students you unassigned—to the number of groups you choose.
Ramifications
- If you add or delete a group in a group set used to create a new group set, the new group set is unaffected.
- If you add or delete a group in a group set that you used to create a group assessment or discussion, that content item’s groups are updated. Edits to group titles and descriptions also affect the content items.
- If you add or delete a group in a group assessment or discussion that's based on a course group set, the course group set is updated. Edits to group titles and descriptions also affect the course group set.
- If you delete a group set used to create a new group set, the new group set is unaffected.
- If you delete an entire group set used to create a group assessment or discussion, the content item’s groups are removed.
- If you delete a group assessment or discussion based on a course group set, the group set is unaffected.
Manage student membership
Open the menu next to a student's name to access these options:
- Start a new group with the student as a member.
- Select Unassign to remove the student from the group. Unassigned students appear at the top of the page.
- Assign the student to a different group that already exists. Select the group's name in the menu. Groups with no members don't appear.
You can also move multiple students to a different group in one action, create a new group for them, or unassign them all from the group.
To remove all students from all groups, select Unassign All at the top of the page.
Ramifications
- Membership changes in a group set affect the content-level items where the groups are used, such as in group discussions and assessments.
- Membership changes in a content-level item based on a course group set affect the course group set.
- Membership changes in a group set do NOT affect other group sets that are based on the group set.
Grading a Group Assignment
After groups submit their assignments, you can start grading their work on the Grades page or within the course. Assign the same grade to the whole group or grade each team member's contribution separately if everyone didn't contribute equally. You can't change grade settings or group membership after you've started grading.
You can't enable anonymous grading on group assignments.
The feedback icon appears next to the group's grade pill. Select the icon to open the feedback panel, which persists on the side of the screen. You can scroll through the assignment and add overall feedback and a grade. You can also embed an audio/video recording of your feedback in the editor as you grade group submissions.

To view the group members, select the group title to access the list. You can also see which member submitted on behalf of the group.

Assign a different grade to group members
By default, a grade for a group assignment is the same for all group members. However, you can change an individual group member's grade if you feel their contribution earned a grade different from the group.
In the submission View, you can assign a grade for the whole group. Type a value in the Grade column. Or, you can assign a grade to a single group member. To assign a different grade to an individual in a group, expand the group list and type a value in the Grade column. The overall group's grade is shown as In Progress. The Post option doesn't appear because some students don't yet have grades for the assignment.
Similarly, after you assign a grade to the overall group, you can edit a group member's individual grade. Expand the list of group members and change a group member's grade as needed. The overall group's grade is shown as Multiple.

You can also assign different grades in the gradebook grid view. Select a group member's cell and all other group members are highlighted in the grid. Edit a group member's grade as needed. You have the option to apply this edited grade to everyone in the group.

| Info |
|---|
| The Groups tool is expected to evolve with feedback from faculty – tell us what you'd like to see and what is essential to your teaching process so we can let the Blackboard developers know! |