Over time, PowerPoint files can easily grow in size as more images are embedded. There are two key techniques you can use to optimize your PDFs before uploading them to Blackboard.
FIRST: Compress Embedded Images
PowerPoint for Windows or Mac- Select image on slide
- Click tool ribbon and select Picture Tools -> Format tab
- Select Compress Pictures
- Chose 96 PPI (e.g., email) to compress the images to the smallest size possible
- If you've cropped the images in the slide, be sure to check Delete cropped areas of pictures so you don't have to redo your work.
- Save or export your file to PDF using one of the methods below.
- If you want to apply this to all images,
- Windows users: uncheck the box for Apply only to this picture.
- Mac users: Select the radio button for All pictures in this file
- If you want to apply this to all images,
NEXT: Save a Smaller Copy
PowerPoint for Windows:
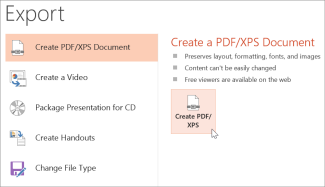
Select File > Export.
Click Create PDF/XPS Document, then click Create PDF/XPS.
In the Publish as PDF or XPS dialog box, choose a location to save the file to. If you want it to have a different name, enter it in the File name box.
At Optimize for, select Minimum size to make the file smaller.
Click Publish.
PowerPoint for Mac:
Click the PowerPoint menu > Preferences.
In the PowerPoint Preferences dialog box, click General.
Under Print Quality (Paper/PDF), set the Desired Quality to an option of your choice.
Set the print quality of the PDF to Medium or Low.
Then generate your PDF using one of these ways:
Save your presentation as a PDF in File > Save As.
Export your presentation as a PDF file by going to File > Export.
Both methods do the same thing, so you can choose whichever you're more familiar with when you want to create a PDF version of your presentation.
NOTE: If you are using Mac OS Preview to generate a PDF:
Open the PDF, then choose File > Export.
Click the Quartz Filter pop-up menu, then choose Reduce File Size.


